We love data engineers — it’s how a lot of us got our starts in tech. One of the main reasons we made Ensign is to make it easier for you to put your data in motion. We know that a clumsy ETL routine can quickly turn a data lake into a data landfill.
In this example we’ll see how to move data around with Ensign. We’ll be calling a weather API and using PyEnsign as a way to both stream and persist weather updates.
Just want the code? Check out this repo for the full example.
ETL Design
The architecture for this weather ingestor is composed of two components:
- An Ensign publisher that calls the Weather API and publishes the weather data to a topic.
- An Ensign subscriber that listens on this topic for weather updates.
Prerequisites
This tutorial assumes that the following steps have been completed:
- You have received an Ensign Client ID and Client Secret. Refer to the getting started guide on how to obtain the key.
- You have received an API key from the Weather API website (it’s free!).
- You have Docker installed and running on your machine.
Project Setup
First, you will need to set the environment variables for ENSIGN_CLIENT_ID and ENSIGN_CLIENT_SECRET from your API Key. (Need a new key?). You will also need to set your weather API key to some environment variable you can retrieve later.
export ENSIGN_CLIENT_ID=<your-client-id>
export ENSIGN_CLIENT_SECRET=<your-client-secret>
export WEATHER_API_KEY=<your-weather-api-key>
Next, let’s create a root directory called weather_data for the application.
mkdir weather_data
We will then create two files, one for the publisher that calls the Weather API to get the latest weather data and the other for the subscriber that consumes the weather updates from the topic stream.
cd weather_data
touch publisher.py
touch subscriber.py
We’ll also need a requirements.txt to install the two main dependencies for the project: the Ensign Python SDK (PyEnsign) and the ever-helpful requests library for making HTTP requests to the weather API.
requirements.txt
pyensign>=0.8b0
requests==2.31.0
Create the Ensign Publisher
Classes in Python are a good way to organize code and create useful abstractions. In publisher.py, we’ll create a WeatherPublisher class to publish weather updates.
import os
import json
import asyncio
from datetime import datetime

import requests
from pyensign.events import Event
from pyensign.ensign import Ensign

class WeatherPublisher:
    def __init__(self, topic="current-weather", location="Washington, DC"):
        """
        Create a publisher that publishes weather events for a location to a topic.
        """
        self.topic = topic
        self.location = location
        self.weather_api_key = os.environ.get("WEATHER_API_KEY")
        self.ensign = Ensign()
Pro Tip: Calling Ensign() will automatically load your client ID and client secret from the environment
Receive and Publish
Most publishers follow the wait-and-publish pattern. They do a lot of waiting, and then occasionally publish one or more events when something happens (e.g. a timer expires or an asynchronous signal is received). In Python, this usually looks like a coroutine with a loop.
    async def recv_and_publish(self):
		"""
        Receive weather events and publish them to the topic.
        """

        # Ensure the topic exists
        await self.ensign.ensure_topic_exists(self.topic)

        while True:
            # Make a request to the weather API
            response = requests.get("http://api.weatherapi.com/v1/current.json", params={
                "key": self.weather_api_key,
                "q": self.location,
            })
            try:
                response.raise_for_status()
            except requests.exceptions.HTTPError as e:
                print("Error fetching weather data: {}".format(e))
                await asyncio.sleep(60)
                continue

            # Parse the response and publish the event
            data = response.json()
            event = Event(json.dumps(data).encode("utf-8"), mimetype="application/json")
            await self.ensign.publish(self.topic, event, on_ack=self.print_ack, on_nack=self.print_nack)

            # Wait 60 seconds in between requests
            await asyncio.sleep(60)
Let’s break this down. We first make a call to ensure that the topic exists in the Ensign project that’s associated with the API key. This will create the topic if it doesn’t already exist. Alternatively, we could create the topic from the project dashboard and skip this step.
# Ensure the topic exists
await self.ensign.ensure_topic_exists(self.topic)
Note: The await syntax is necessary because the PyEnsign client is asynchronous. If you’re unfamiliar with the asyncio library, read more about that here.
Next is the loop to query the weather API and create events. We’ll also include try/except handling to catch HTTP exceptions. HTTP errors can be anything from running into rate limits to the weather API being deprecated. Ideally we would want to utilize a logging tool here to be able to tell what happened externally, but for right now we’ll settle for printing to STDOUT.
while True:
	# Make a request to the weather API
	response = requests.get("http://api.weatherapi.com/v1/current.json", params={
		"key": self.weather_api_key,
		"q": self.location,
	})
	try:
		response.raise_for_status()
	except requests.exceptions.HTTPError as e:
		print("Error fetching weather data: {}".format(e))
		await asyncio.sleep(60)
		continue
The requests library gives us a dictionary, but Ensign requires event data to be bytes. We could choose any serialization format. For this example we’ll use JSON, so we’ll create an Event with the encoded JSON data and corresponding mimetype.
	# Parse the response and publish the event
	data = response.json()
	event = Event(json.dumps(data).encode("utf-8"), mimetype="application/json")
	await self.ensign.publish(self.topic, event, on_ack=self.print_ack, on_nack=self.print_nack)
The publish API allows us to define asynchronous callbacks to be invoked when an event is acked or nacked by the Ensign service. These are optional, but are useful for debugging and/or logging.
async def print_ack(self, ack):
	ts = datetime.fromtimestamp(ack.committed.seconds + ack.committed.nanos / 1e9)
	print("Event committed at {}".format(ts))

async def print_nack(self, nack):
	print("Event was not committed with error {}: {}".format(nack.code, nack.error))
Finally, we will sleep until the next time we want to call the weather API. How long to sleep is dependent on the use case; some factors to be considered are API rate limits, how often the data source changes, and the desired event granularity (e.g. do we want to capture weather updates every hour? every day? every week?).
Kicking off the publish loop
Finally we need a way to run the publisher. The easiest way to run coroutines in Python is asyncio.run, but we will also potentially want some additional configuration.
    def run_forever(self):
        """
        Run the publisher forever.
        """
        asyncio.run(self.recv_and_publish())

if __name__ == "__main__":
    # Create a publisher
    topic = os.environ.get("WEATHER_TOPIC")
    location = os.environ.get("WEATHER_LOCATION")
    publisher = WeatherPublisher(topic=topic, location=location)

    # Run the publisher forever
    publisher.run_forever()
Create the Ensign Subscriber
Next we’ll create the subscriber to consume from the weather events topic. Subscribers also usually have a loop; they listen on a topic for events and process events as they come in. In order to process events one at a time, we can use the async for syntax.
import os
import json
import asyncio

from pyensign import nack
from pyensign.ensign import Ensign

class WeatherSubscriber:
    def __init__(self, topic="current-weather"):
        """
        Create a subscriber that subscribes to the weather topic.
        """
        self.topic = topic
        self.ensign = Ensign()

    async def subscribe(self):
        """
        Subscribe to weather events on the topic.
        """

        # Ensure the topic exists
        await self.ensign.ensure_topic_exists(self.topic)

        async for event in self.ensign.subscribe(self.topic):
            # Attempt to decode the JSON event
            try:
                data = json.loads(event.data.decode("utf-8"))
            except json.JSONDecodeError as e:
                print("Error decoding event data: {}".format(e))
                await event.nack(nack.UnknownType)
                continue

            print("Received weather event for {} at {} local time".format(data["location"]["name"], data["location"]["localtime"]))
            print("Current temperature is {}°F".format(data["current"]["temp_f"]))
            print("Feels like {}°F".format(data["current"]["feelslike_f"]))
            print("Humidity is {}%".format(data["current"]["humidity"]))
            print("Wind is {} mph from {}".format(data["current"]["wind_mph"], data["current"]["wind_dir"]))
            print("Visibility is {} miles".format(data["current"]["vis_miles"]))
            print("Precipitation is {} inches".format(data["current"]["precip_in"]))

            # Success! Acknowledge the event
            await event.ack()

    def run_forever(self):
        """
        Run the subscriber forever.
        """
        asyncio.run(self.subscribe())

if __name__ == "__main__":
    topic = os.environ.get("WEATHER_TOPIC")
    subscriber = WeatherSubscriber(topic)
    subscriber.run_forever()
Remember that when publishing an event we wrap the data into the Event object. The subscribe API yields the same Event data type, so we can directly inspect the data payload, metadata, and other attributes on the event. This also allows us to ack an event, indicating to the server that it was successfully processed, or nack an event, indicating to the server that it should be redelivered to another subscriber.
What it means to process an event is different depending on the use case. In this example, we are just interested in viewing the event data, but in other cases a subscriber might perform intermediate processing, train an online model, etc. and publish new events to downstream topics.
Docker-izing the application
Eventually we will probably want to deploy our app somewhere. For now we’ll settle for running things locally, but building a docker image is a first step towards running the app in production. The minimal Dockerfile just needs to install the project requirements and the Python source files.
Dockerfile
FROM python:3.8-slim-buster

WORKDIR /app

COPY requirements.txt requirements.txt
RUN pip3 install -r requirements.txt

COPY . .
We can test the application locally by creating a docker compose file, making sure to include all of the required environment variables:
docker-compose.yaml
version: '3'
services:
  publisher:
    build: .
    command: python -u publisher.py
    environment:
      WEATHER_API_KEY: ${WEATHER_API_KEY}
      WEATHER_TOPIC: ${WEATHER_TOPIC}
      WEATHER_LOCATION: ${WEATHER_LOCATION}
      ENSIGN_CLIENT_ID: ${ENSIGN_CLIENT_ID}
      ENSIGN_CLIENT_SECRET: ${ENSIGN_CLIENT_SECRET}

  subscriber:
    build: .
    command: python -u subscriber.py
    environment:
      WEATHER_TOPIC: ${WEATHER_TOPIC}
      ENSIGN_CLIENT_ID: ${ENSIGN_CLIENT_ID}
      ENSIGN_CLIENT_SECRET: ${ENSIGN_CLIENT_SECRET}
Let’s Gooooooooo
We made it to the end! Once you have all of the code in place, ensure that you have the WEATHER_TOPIC and WEATHER_LOCATION environment variables set to your preference.
export WEATHER_TOPIC=current-weather
export WEATHER_LOCATION="Washington, DC"
Then, use the following commands on the terminal to build and run the application.
docker-compose -f docker-compose.yaml build
docker-compose -f docker-compose.yaml up
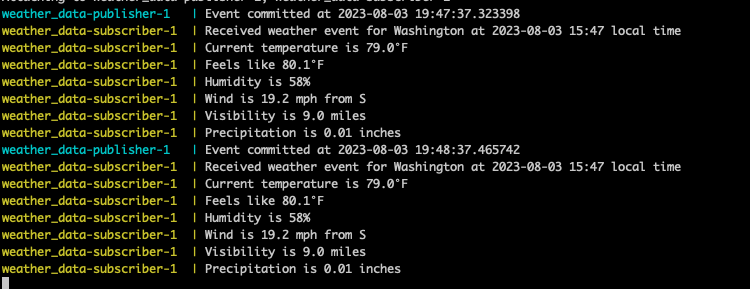
You should see the publisher and subscriber running and printing messages to the screen.
Next Steps
Hopefully running this example gives you a general idea on how to build an event-driven application using PyEnsign. You can challenge yourself by creating another subscriber that takes the records produced by the publisher and updates a front end application with the latest weather data.
Ensign is an event streaming platform, but it’s also a database! This means that you don’t have to worry about events being deleted, and you can even execute SQL queries over topics using enSQL! Embracing event-driven architectures and data streams gives you more flexibility. You no longer have to deal with all your users hitting a single database. Instead, you can simply publish different data streams from your database to meet all your various end user data requirements. By controlling access to data streams, you can enable developers to build applications directly with production data and help them deploy those applications faster and with less headache.
Let us know (info@rotational.io) what you end up making with Ensign!